
How to Design a Creative exhibition stand
You have come here because you have, want or would love to…. design a creative stand, and you have no pale idea how to do it, perfect! It turns out that this pocket guide is exactly what you need to get started, and beyond; This document is for people who have no knowledge of design, 3D programs, or construction techniques, that is, we start from scratch. But don't be scared, the idea is that in the end you can have a basic handling of the elements that allow you to structure a project.
1- The briefing to design a stand
Don't start designing an exhibition stand without a briefing.
Ok, you have everything in your head and an IQ of 150, congratulations. I repeat: Don't start without a briefing 🙂 Why? Because after 20 years designing stands, I could do it with my eyes closed... I wouldn't do it without a briefing.
The design briefing is the explorer's map in a jungle: it allows you to clear the undergrowth and identify the correct path that leads you to the forbidden city. It tells you where the traps are and how to get out of the adventure. Trust me, you don't want to be ripped in two by the last of the traps, so make sure you review every last point of your briefing and make it as complete as possible. What should a stand design briefing detail?
Checklist to design a stand
If we ask chatgpt what a stand is, (don't worry, this is all chatgpt will say in this guide) it will reply:
Design a stand according to ChatGPT
“A trade show booth is a physical space, usually at a trade fair or exhibition, designed and built for a company or organization to display its products or services to the public. “Exhibition stands are an important form of marketing and promotion for companies, as they allow them to interact with potential customers and show them what they have to offer.
Ok, you already knew that, we all knew that, but it was important to start here. We are designing a "physical space" in which there will be products, people, messages, communication...an endless number of interactions that we need to know about or study before starting.
How to start design a creative trade fair stand? I will explain it to you while I make an example design, so you can check what I explain in a practical case.
- A: The measurements of your fair stand stand and its exact location at the fair;
- B: Summary of the Exhibitor's Manual of the fair, indicating the regulations of the fair in terms of design, maximum heights, maximum enclosure, setbacks, number of days of assembly of the fair...
- C: What kind of booth do you need to design? Is it a corporate stand? Product oriented? What are the dynamics that will take place at the stand and what is their relative importance?
- D: What are the products or services that the stand will offer (I mean all of them, without forgetting any) this will determine the areas you need;
- E: What is the most important point of your stand? Is there a star product? a live show? an interactivity?
- G: Areas of your stand: Regardless of the design, the commercial area, the product area, the warehouse if there is one... they need a few square meters according to your needs.
- H: What is your budget? Take a look at this design brief, the bare minimum you should have to get started:
Briefing example for the design of a creative stand
General characteristics:
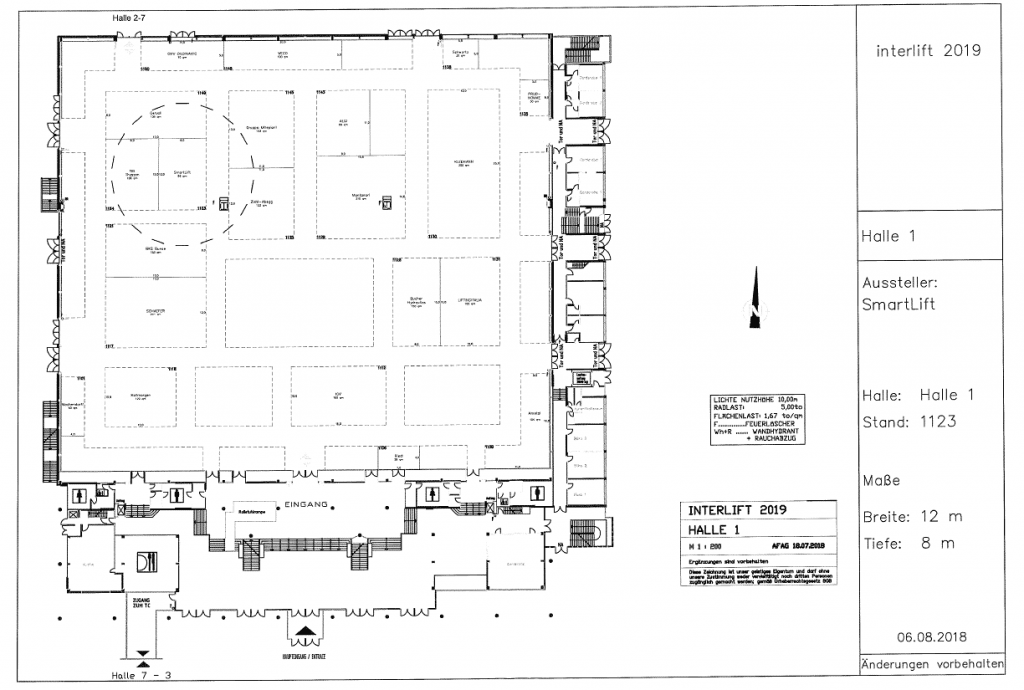
| Trade fair | Interlift |
| Location | Augsburg-Germany |
| Date: | 17-23 sept/2023 |
| Measures | 8.00 x 5.00m |
| open sides | 3 |
| Maximum height allowed | 5:00 a.m. |
| Maximum side closed: 50% | |
| Necessary setback | NO |
| Floor | Carpet |
| Walls | Painted Chipboard |
| column cladding | NO |
| Rigging/air | Forks |
Booth areas:
I outline each area and its relative importance below.
1 and 6: Bench or long table with stools for customer service and display of products on panels (40% of the stand) This is the most important point to take into account when designing a stand. The product must be accessible to show customers at the tables
2: Relaxation area (25% of the stand)
3: Product image 1 (walls)
4: Wall with TV
5: Bar area and warehouse with TV (25% of the stand)
7: High tables and stools distributed throughout the rest of the stand (10l stand)
fair plan
2- Distribution scheme to design a stand
Whether you are going to commission the design from a company or if you plan to design it yourself... a distribution diagram will save you a lot of time. It's so easy you can do it even on a bar napkin. You only have to define the areas of the stand and its square meters.
You can structure the most important areas and place them in the streets of the stand that most interest you. You will also know what is the highest number of people in order to maximize the visibility of your star spots.
Here you have a fantasy design, based on the example briefing that I just left you. A stained napkin! You do not need anything else. You never know when ideas come...
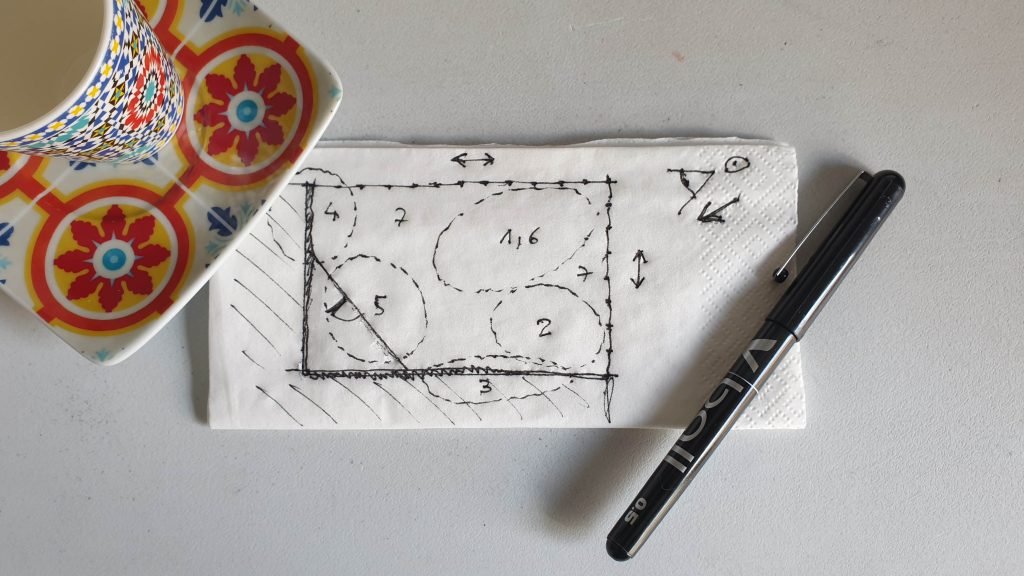
In this case, as you can see, only areas have been marked, more or less scaled in a space measured by eye and with its neighbors and corridors. If there was a fair column, it would be good to mark it, in this case there isn't.
3- Communication message of your stand
What do you want to transmit? you may want:
- Strengthen the presence of the brand
- Relate the brand to a specific concept (such as sustainability, for example)
- Relate the brand to a specific experience
- Sell products directly at the stand
- Do business at the stand, create synergies, new relationships
Example case:
In this case, the messages that are tried to be transmitted in order of priority are:
1- Brand presence oriented to the entire fair (air)
2- Closeness with the client, to be able to show the product in operation in a relaxed environment (central tables)
3- Reinforce through images and audiovisuals 2 brand products (walls)
4- Communication levels
There are different levels of communication in a design, and of course designing an impactful creative stand implies having this very, very polished.
Broadly speaking, we can distinguish 3 types of messages:
- Primary: as the reinforcement of the brand
- Secondary: for example, linking the brand to a concept
- Tertiary: how to sell or highlight products or services in a special way.
It is important that you organize the information in these categories as it will help you to have different levels of reading of your design. A good design always begins with the concepts, it is essential to have them clear before starting.
Example case (messages)
– Primary: Logo in height
– Secondary: closeness to the customer at the tables and images of products at eye level
– Tertiary: Audiovisuals on TV
4- Pinterest
Once you have all this information clear, you go to Pinterest (you are already taking time) 😉
Here you will create a board with ideas that you find interesting for each area. In our case we have created the following dashboard:
From this board the following ideas have emerged that will help us to design an impactful creative stand
aerial
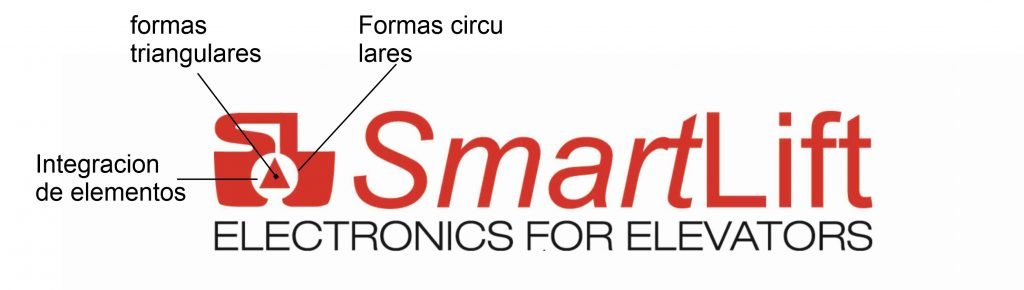
A branded aerial cylinder so that the brand can be seen from all over the fair. We liked the option of 3 cylinders integrated in different angles. The logo has an element integrated into a circle.
overall aesthetics
Continuing with the company logo, you can see that circular shapes are combined with a triangle. This has led us to think about combining these two aesthetics, one for the upper part (curve) and another for the lower part (angular lines). In the lower part, the idea is to play with the graphics to achieve this effect, saving on carpentry.
Minimalist table style
We believe that the tables have to be simple, so as not to complicate the overall image. We could have made tables with angular shapes too, but we believe that the design would be cluttered. On the board we have found some models of tables that seem appropriate to us
Stand center stand with raised platform
Taking into account that the budget is not very high, we have thought of raising only the most important part of the stand (detailed in the briefing), that is, the central part. On the pinterest board you can see how in some images certain areas of the platform stand out with another color, this is what we plan to do.
And how do I find all this on Pinterest? will you say…
The truth is that we have cheated... but we are going to reveal the secret to you. Here you have an essential list to organize your stand designs on Pinterest:
Trade show stand design ideas:
- Angled stand designs
- Designs of stands with audiovisuals
- Design of stands with girders
- Stand designs with ceilings
- Stand designs with counters
- Design of Curved stands
- Designs of stands with double floor
- Design of polygonal stands
- D.stand designs with rounded edges
- Design of stands with sequences of elements
- Stand designs with facades
- Design of graphic stands
- Air Banner Stand Designs
- Design of stands with suspended elements
- D.Hexagonal stand designs
- Design of stands with leds
- Stand designs with latticework
- Mobile World Congress stand design
- Stand designs at CPHI
- Design of small stands
- Stand designs with straight lines
- Design of stands with stretched fabric
- D.Stand designs with tensioned rope
- Unconventional booth design
- Cardboard Stand Designs
- Design of ecological stands
- Minimalist stand designs
- Design of stands of organic shapes
- Stand designs at FITUR
- Design of stands at IFA
5- Design of the fair stand
At this point we are ready to sketch out a design. This is where I recommend you: Hire a designer! no,? so we continue:
You are going to do the design yourself, ok. Here you will need a clearer outline of each element and some other course of the following programs:
–Sketchup (PC)
– 3d studio max (PC)
–Cinema 4d (MAC)
– Blender (free)
–rhino
(There are others, but 90 percent of the market is dominated by these programs, sketchup being the dominant one today) Blender, if you are going to start from scratch... it is free, although my recommendation is Sketchup since it also allows you to make plans for construction and they have a huge free 3d library. (3dwarehouse.com)
What do you already know how to use? wait you still have one step left:
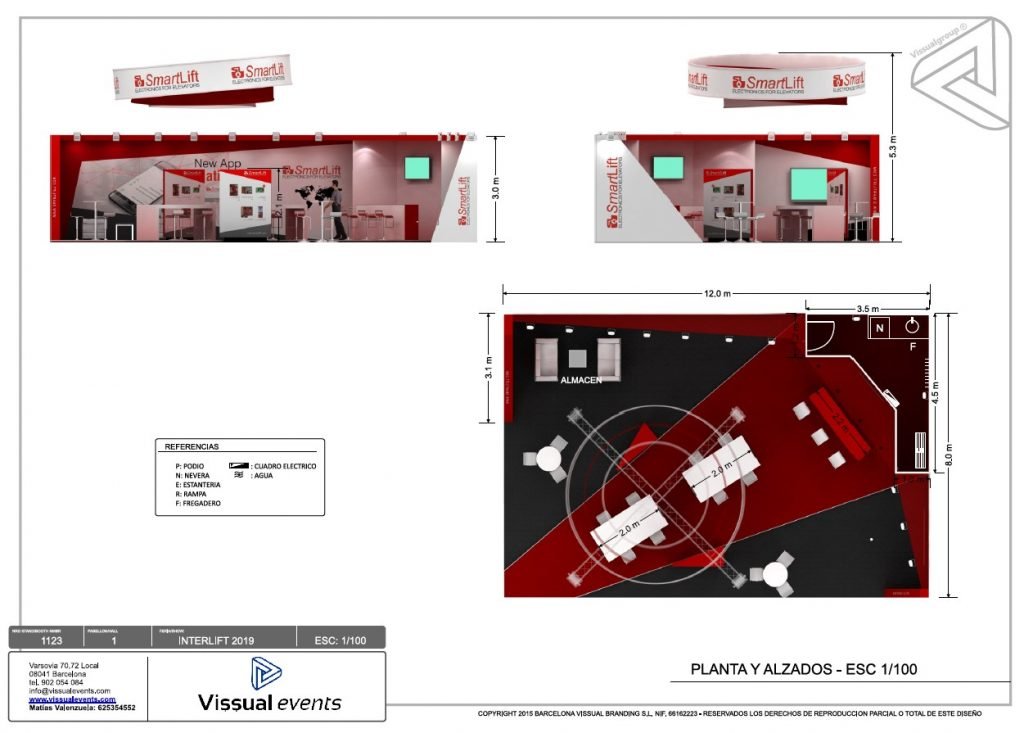
Detailed plant:
Before making a 3d we need to make a more detailed plan of the stand, already with measures implementing the ideas of our pinterest.
For this I ask you to make a drawing of the space on a plan with Boli on a grid sheet subdivided meter by meter with a grid. We will do the design in pencil so that the grid lines are not erased.
Elevations:
Depending on the design before going to the 3d program, it is not bad to have an elevation (this helps to measure the heights of the elements, although it is not essential since you will be able to see as the drawing is raised.
Here is the plan that we have worked with some explanations of the design:

In this design there are some elements to highlight (see plan)
1- platform that ranks the most important part of the stand. The rest of the stand is carpeted directly on the floor, which means cost savings.
2-Support walls for the back: it is very important to think about how the elements are going to be supported!
(anyway it is always important to have your design reviewed by an architect before being built)
3-These triangular ceilings help create the look and feel without using a lot of wood (cost savings again) They can have recessed lighting for wall graphics
4- The air is important to check the measures available with a provider. Initially we make an outer circle and after talking with the air carrier we see what measures can be placed concentrically. In this case we use Aluvision circles (see web)
To support it, it is necessary to place a truss in the shape of a cross, or square. The cost of the truss can vary greatly depending on the fair and the location in the pavilion. If you want to learn more about these costs you can visit the following post:
5- We have also made the exhibitors triangular, helping their visibility from the streets.
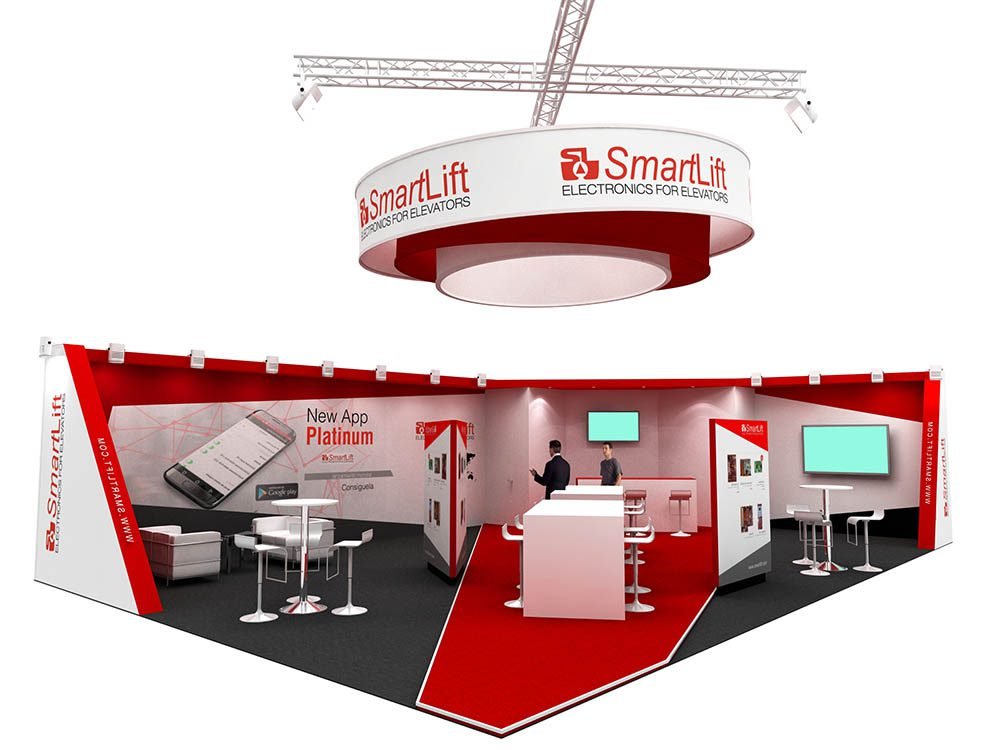
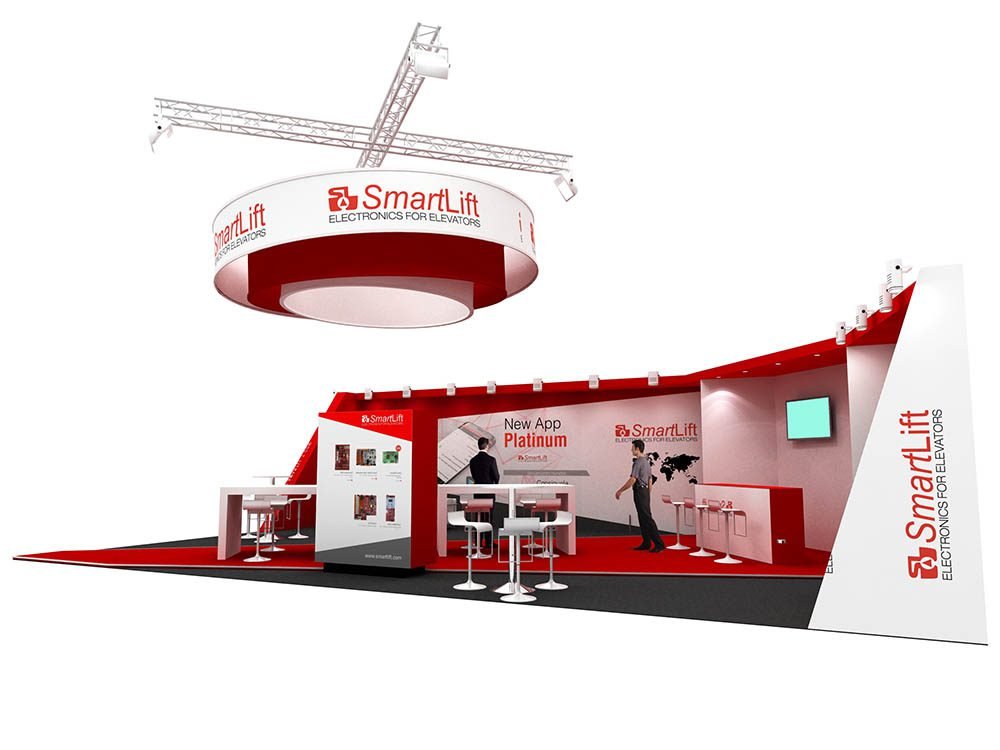
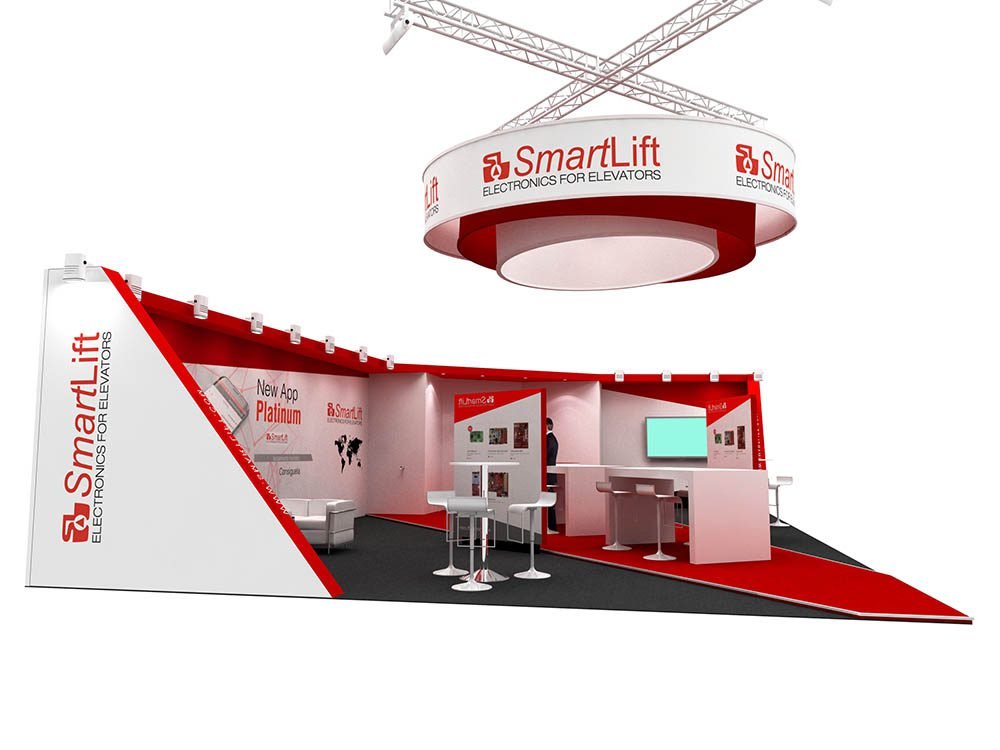
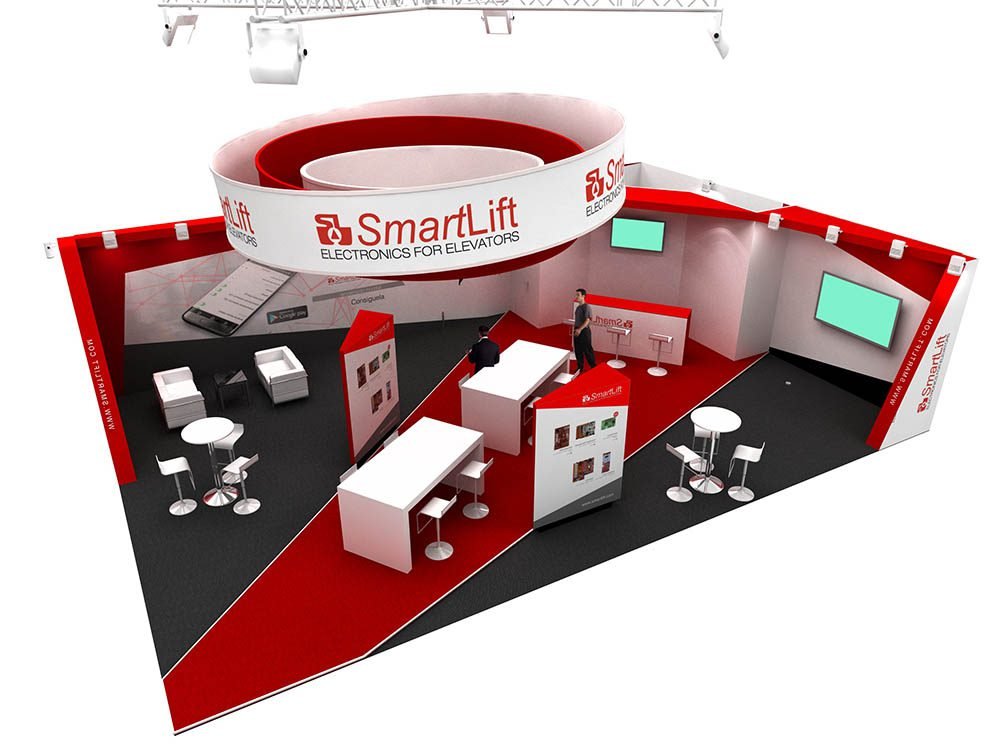
final renderings
If you have come this far, with a design and a 3d, bravo! I hope you have been great. If not, do not be discouraged, the truth is that it takes years to reach a good level of design. Normally a designer has all this in their head, thanks to Pinterest today you can skip several steps. Wait a bit though…the AIs are going to be a lot of help in a very short time.
Here is the final design
If you liked this mini-course… share it! We want to reach a lot of people to continue making more content. If you want some advice with your designs… leave it in the comments!


